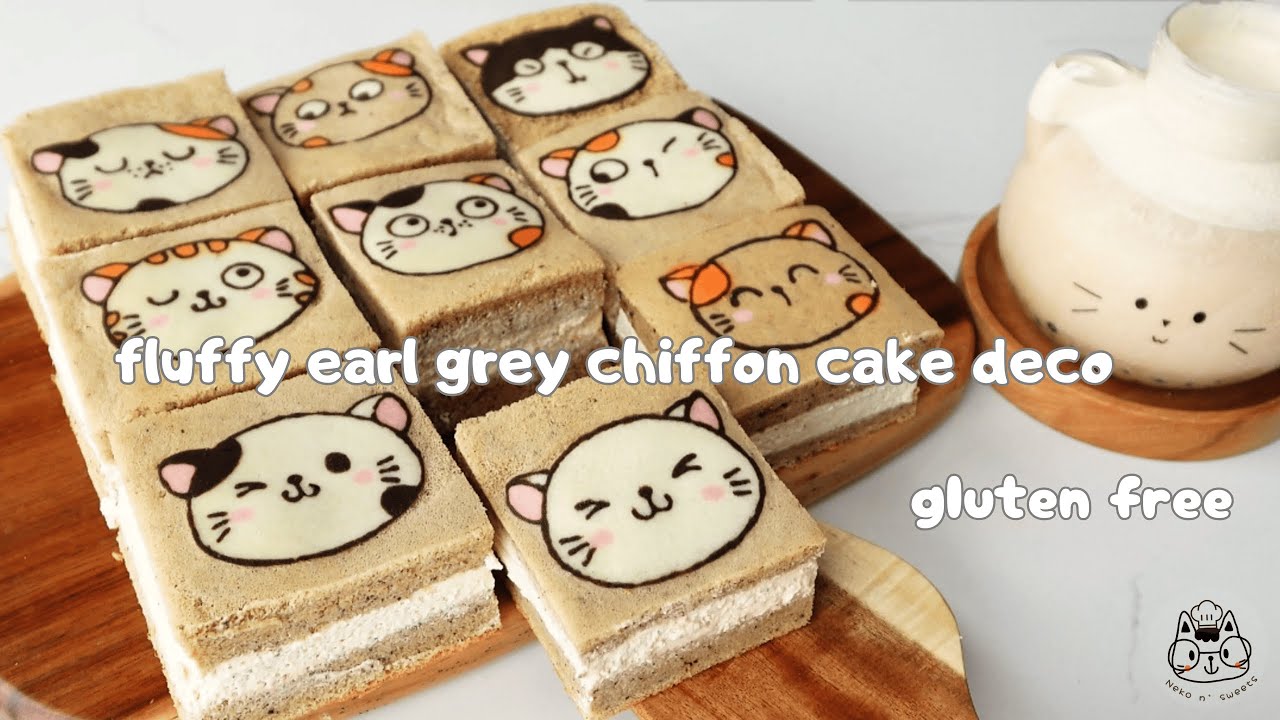
Discover a delightful gluten-free Earl Grey chiffon cake with adorable cat patterns. Fluffy, flavorful, and perfect for any cat lover!
Delightful Treats for Cat Lovers: Whip Up This Light and Airy Cake!
This recipe offers a delightful method for creating a super soft and fluffy gluten-free Earl Grey chiffon cake with charming cat patterns. By utilizing regular rice flour, rather than specialty flour typically found in supermarkets, bakers can achieve a light and airy cake base that pairs beautifully with a rich milk tea cream cheese frosting. The combination of the delicate Earl Grey flavor and creamy frosting is sure to impress even the most discerning taste buds, making it a must-try for anyone with gluten sensitivities.
The preparation involves several key steps, starting with the creation of the Earl Grey milk tea, followed by the decoration batter which allows for hand-painted designs on the cake. The chiffon cake batter is made with simple ingredients, including eggs, oil, and milk tea. Notably, it is important to monitor the consistency of the batter, ensuring it remains smooth and slightly thick without becoming dense. Tips such as brushing oil on parchment paper and chilling the decoration batter enhance the final presentation of the cake, ensuring that the designs hold their shape during baking.
For the frosting, a mixture of cream cheese, heavy cream, and Earl Grey tea creates a luxurious topping that complements the cake perfectly. The recipe emphasizes the importance of not overwhipping the egg whites and adjusting baking times based on individual ovens to achieve optimal results. This unique baking project not only showcases the creativity of the baker but also offers a delicious treat that combines culinary skills with artistic flair.
Whisk Up Whimsy: Bake a Purr-fectly Light Earl Grey Delight!
To switch subtitle languages, go to ‘Subtitles/CC’ in the settings and select your preferred language. Pour 110g of milk into a pot and heat over medium-low heat avoid high heat to prevent the milk from boiling over When the milk starts to simmer gently, turn off the heat. Add the tea bags and cover the pot tightly with a lid. Steep the Earl Grey tea in the milk for at least 30 minutes . * Unsalted butter: 20g, softened at room temperature. * Egg white: 20g. * Powdered sugar: 20g. * Rice flour: 22-24g.
Add the egg white, powdered sugar, and rice flour gradually Note: See more in the description section. mix until the batter reaches a smooth, slightly thick, flowing consistency, as shown in the video Divide the batter into separate bowls to mix in the colors. Today, I plan to make a cute cat-shaped cake, using gel food coloring to color the batter into different colors: black, pink, orange, and white You can draw anything you want (or even print images from the internet) and mix colors to match your design. (since rice flour is whiter than wheat flour, you don’t need to add white food coloring to get a white batter). Then, transfer the colored batters into small piping bags. Prepare a mold and a drawing of your choice that is the same size as the size of the mold.
Use parchment paper or a non-stick baking mat This is my drawing, I hand-drew all of these little cats! 😊 Place parchment paper over the drawing. Brush oil or butter onto the entire surface of the parchment paper. Start by outlining the edges and smaller details first. Then, “fill in” the larger details with color. Use a toothpick or a small-skewered stick to carefully trace the edges of the details, ensuring there are no air bubbles and no areas missing the colored batter. Once the drawing is done, place the parchment paper into the fridge or freezer for 10-15 minutes. The butter in the batter will firm up, helping the design stay in place when you pour the cake batter on top. let’s prepare the chiffon milk tea cake batter.
Strain the milk tea mixture after steeping the Earl Grey tea with milk. Keep about half of the tea leaves to add to the cake, which will enhance the fragrance and tea flavor in the cake. Ingredients for Earl Grey Chiffon Cake Batter: * 4 large eggs (65-70g each with shell) * 50g oil * 65g milk tea (strained) * 70g sugar * 80g rice flour * the reserved tea leaves * 3g vanilla extract * A pinch of salt * 1-2g cream of tartar or a few drops of lemon juice Separate the egg whites from the egg yolks. Beat the 4 egg yolks until smooth. Add 65g milk tea, 50g oil, 80g rice flour, mix everything together until well combined.
Add 3g of vanilla extract and the reserved tea leaves. Mix thoroughly, then set aside. Add a pinch of salt to the egg whites Use a hand mixer to beat the egg whites until large bubbles appear. Add cream of tartar (or replace it with a few drops of lemon juice or vinegar). starting at low speed Divide 70g of sugar into 3-4 portions and gradually add it during the whipping process. gradually increasing to medium-high speed.
Whisk until the mixture becomes thick, shiny, and free of large bubbles. When you lift the whisk, a soft peak should form that droop or curl. (Do not overwhip the egg whites to the point where they become dry and crumbly, as this will make it difficult to mix evenly into the batter.) Take 1/3 of the meringue and add it to the bowl with the egg yolk mixture. Mix freely to combine. Next, add another 1/3 of the meringue. This time, mix more gently than before. Pour the entire batter into the remaining meringue. Use a flat spatula to gently fold the mixture together, moving from the bottom up.
Take the pattern sheet out of the freezer and place it in the mold. Pour the cake batter into the mold use a spatula to spread the batter evenly.. Drop the mold from a height of 20cm onto a flat surface a few times to release large air bubbles. This also helps the batter settle into every corner of the mold. Bake the cake at 150°C (302°F) for 45 minutes (The oven needs to be preheated for at least 10 minutes). Adjust the temperature and baking time according to your oven. (You can check by inserting a skewer into the cake, if the skewer comes out clean and dry, the cake is fully baked.) Avoid underbaking, as excess moisture may cause the cake to shrink significantly and collapse after being removed from the mold. Also, avoid overbaking or using too high temperature, as this may cause the patterns on the cake to brown and the cake will lack its moistness and softness. While baking the cake, let’s prepare the milk tea cream! Pour 300ml of heavy cream into a pot I love the rich flavor of Earl Grey tea, so I used 3 tea bags.
Cut open the tea bags and add the tea leaves directly into the cream. Place the pot with the cream and tea on the stove, set the heat to medium-low, and stir constantly to prevent sticking avoid high heat as it may cause the cream to separate or boil over Stir continuously until the tea releases a deep brown color and the cream mixture simmers lightly. Immediately turn off the heat, cover the pot tightly, and let it steep for at least 30 minutes. Let the cream-tea mixture cool naturally strain it through a sieve to remove the tea leaves. Seal the cream tightly and place it in the refrigerator to chill thoroughly before whipping. The process of preparing milk tea cream takes time because the cream needs to steep with the tea long enough to extract its full flavor. Additionally, cooling the mixture and ensuring it’s deeply chilled before whipping also takes time.
The cake has finished baking! tap to release excess moisture. Normally, after baking a chiffon cake, we turn the pan upside down on a rack to cool. This helps prevent the cake from deflating too much when removed from the pan. However, since we’ve painted on the bottom of the cake today, we need to remove the cake immediately after baking to prevent moisture from ruining our drawing! Use a specialized tool or a small knife to loosen the edges of the cake. Turn the cake upside down on a rack like this. The most nerve-wracking moment has arrived let’s peel off the baking paper and reveal the design! Tadaaa!!! Here’s the result: The colors of the little cats are perfectly preserved!.
Touch the meow meow drawings! The cake is soft, springy, and the artwork is dry and intact. Wonderful! 200g of cream cheese soften at room temperature Whisk the cream cheese with about 3g of vanilla extract and 10g of sugar until smooth and creamy. Place a bowl of ice water under the mixing bowl to help the cream whip faster. Take the deeply chilled milk tea cream out of the fridge Transfer all the milk tea cream to the bowl, add 20g of sugar and a few drops of vanilla extract. Whip until smooth, then add the cream cheese mixture.
Continue whipping until stiff peaks form. Use a knife to trim the edges of the cake for a clean finish. Slice the cake into two layers Brush milk or milk tea onto the cut surface of the first cake layer. Pipe the whipped cream evenly over the entire surface of the first layer (Use a piping bag to ensure the cream is evenly distributed) spread the cream with a spatula. Smooth the cream along the edges.
Place the second layer on top Finish by smoothing the cream over the sides of the cake All done! It’s time to slice the cake and enjoy! Don’t forget to make a glass of brown sugar bubble milk tea topped with salted cream cheese first! Now, enjoy it! The cake is incredibly soft, fluffy, and wonderfully fragrant with the aroma of Earl Grey tea. Even though it’s made from rice flour, it’s just as tender as cakes made with wheat flour. Not only is it soft and fluffy, but it also has a light chewiness that makes it absolutely irresistible! Mlem! Thank you for watching my first video.
If you enjoyed it, please Like and Subscribe to support me in creating more video!