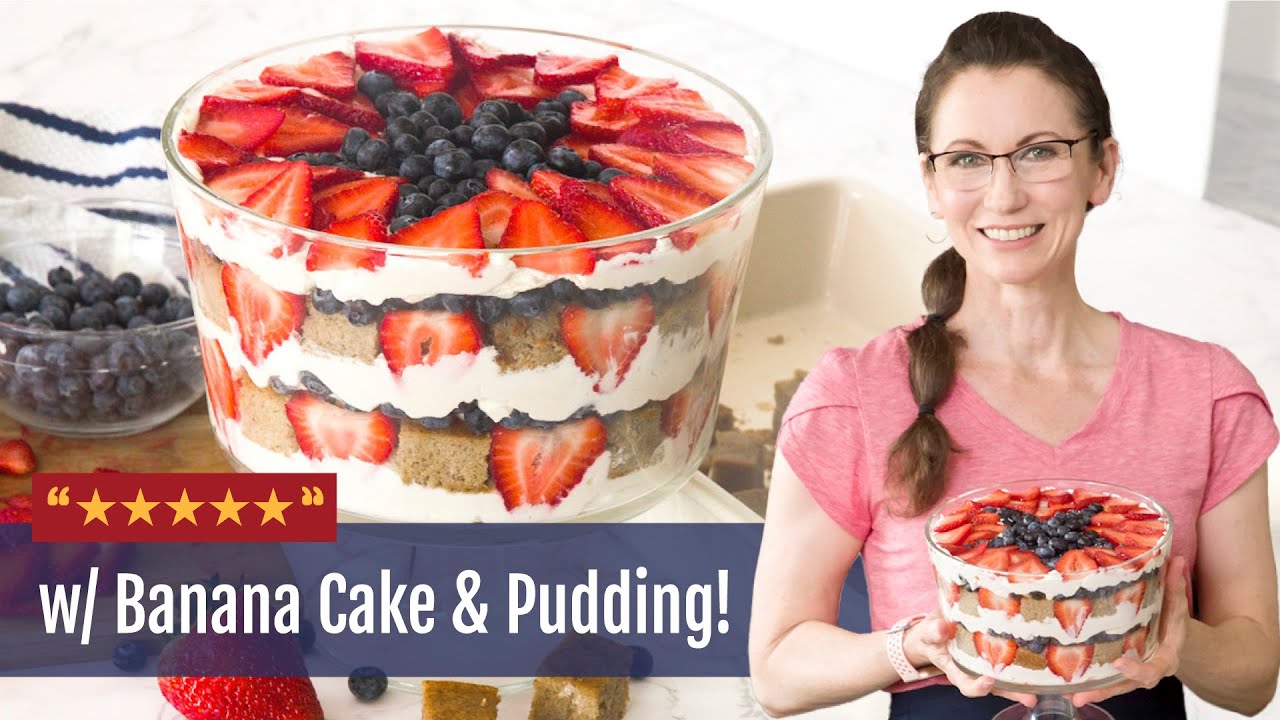
I’m excited to show you how easy it is to make this patriotic dessert with layers of cream cheese whipped cream gluten-free banana cake made with almond flour a natural banana pudding made with a real banana and fresh strawberries and blueberries so we’re going to start with making our natural banana pudding so I’m going to add one banana to a mediumsized.
Saucepan and then we’re going to add 34 of a cup of coconut milk and this is the milk that comes in a can not in a carton and as our natural sweetener we’re going to add two tablespo of maple syrup and for flavor we’ll add a teaspoon of vanilla a four a teaspoon salt and then as our thickener we’re going to add 2 tbspoon of tapioca flour now you can put.
All of these ingredients into a blender like a Neutra bullet or a Vitamix I’m going to go ahead and just blend them right here in my pan using my immersion blender go and this will make sure that you don’t have any banana clumps and it also Blends in the tapioca flour and then you’ll want to turn your heat to medium and then just continually.
Stirring until it comes to a really light boil and then as soon as it comes to a really light boil you want to continue to stir it for about another four or 5 minutes just as it thickens up so you can see those nice big bubbles showing off how nice and thick that it is so we’ll go ahead and remove this from heat and now we’ll want to transfer.
It to a heat proof Bowl now this pudding is going to thicken as it cools so we can put this in the fridge for probably about 3 or 4 hours hours to cool off completely or you could speed it up a little bit by putting it in the freezer until it’s cool probably about 30 minutes to an hour and of course you can make up a pack of your favorite banana.
Or vanilla pudding if that’s your preference I’m going to go ahead and put this in my freezer while we work on the cake to replace the angel food cake that is typically used in a berry trifle we’re going to make a banana cake we’re going to begin by mixing our wet ingredients and we’re going to start with two very ripe bananas cuz that’s.
When they are sweetest now you could Mash these with a fork on on a plate but I prefer to just put them right into my bowl with the other wet ingredients and then I can mix them with my immersion blender and that just makes it extra smooth without any banana clumps but I don’t want to add the eggs at this point because I don’t want them to get over.
Mixed so I’m going to skip ahead to my other wet ingredients which is 1/3 a cup of applesauce which just adds another really fresh flavor 13 cup of maple syrup as our natural sweetener 3 tbspoon of coconut oil 1 teaspon of vanilla for added flavor 1/4 teaspoon of almond extract and now I’ll take my immersion blender and just blend it all until.
Smooth and now I’ll go ahead and add my eggs which is three eggs plus one egg white and I’m just going to mix this a few times until blended and now we can add our dry ingredients which includes 2 and 1/2 cups of almond flour half of a cup of tapioca flour 1 teaspoon of baking soda and half a teaspoon of salt and then.
I’ll use my whisk attachment on my versiion blender and then I’m going to mix these just until they’re Blended and now we can pour this into a 9×2 or 9×13 pan and make sure you spray it really well with some non-stick cooking spray so it’ll be easy to get the cake out once it’s baked now our batter will seem a little bit shallow in.
This pan but that’s okay because we’re cooking this cake and then we’re going to either crumble it with a fork or cut it into little squares before putting it into our trifle if we were making this as a full banana cake we could maybe 1 and a half or even double the recipe to have a little bit higher cake now this is ready to go into a 350° oven for.
About 18 to 22 minutes or until the sides and the top turn a slight golden brown and a toothpick comes out clean well here’s a cake that I cooked earlier and you can see what a nice sponge that it creates now for creating the cake layer in our trifle we have two options we can either just take a fork and go in and start breaking up pieces of cake or.
We can take a knife and cut these into small squares so you just take your knife and you’re going to kind of eyeball about 1 in cubes and this cake will be super easy to cut through so you just take a nice little serrated knife and you can quickly make long strips of cake and then just flip your cake and make some strips going the other.
Direction so now I have these super cute little banana cake cubes that are ready to go into to our trifle and the best part is that no one will notice if one is missing oh man that is so good I just eat the cake like this to make our cream cheese whipped cream we’re going to start with 1 and 1/2 blocks of cream.
Cheese or 12 oz as our natural sweetener we’re going to add 3 tbspoon of maple syrup 1 teaspoon of vanilla 1 teaspoon of lemon juice just to wake up the flavors and a four a teaspoon of salt and I’m just going to use my immersion blender to mix it until it’s smooth and creamy I think we’ll go on a lower speed there we go a little.
Better wow that looks good I think we need a little pinky test M now you could definitely just use this as a cream cheese frosting now I’ll set this aside and then we’re going to make our whipped cream and I’m just using the tall Beaker that comes with my immersion blender we’re going to add 2 and 1/2 cups of heavy whipping cream now.
Heavy whipping cream is the same as whipping cream it’s just a little bit higher in the fat content and therefore holds its shape a little bit better but you could use either one and then I’ll just mix this until we have our stiff peaks that is always # satisfying when those stiff peaks form and then now we want to combine our whipped cream with.
Our cream cheese I know this looks like a lot but we have a big trifle bowl to fill and then again I’ll just take my whisk I’m going to turn the speed to low and then just very gently kind of fold these together just until they’re Blended because we don’t want to break down our whipped cream that looks so good I think we need.
Another quality control pinky test spot on and then we’ll go ahead and let this sit in the refrigerator until we’re ready to assemble our trifle and now we can prep our strawberries and I’m going to start with a 2 lb package that I’ve already rinsed and dried and then we’re simply going to cut out the stem and then we want to slice these into.
About 8 in thin slices and we want to go vertically so we have that nice triangular shape of the strawberry so we can just start at one end and just simply slice down making some nice even and thin slices of strawberries and now we can assemble our trifle now we want to start with a layer of cream and then cake and.
Berries and then cream and then cake and berries and then and cream on top so we’re going to have three layers of cream so we need to keep that in mind as we put cream inside of our trifle so we’re going to measure out about a third I find it works best is if you first kind of dump your cream into the center of the bowl and then you can gently push.
It to the outer edge with your spatula and this keeps it nice and neat on your edges and this trifle bow kind of creates its own natural turntable which makes it really easy to just Spin and spread the cream now this is where you have full creative license if you’d like it to feel a little bit more kind of messy and thrown together or if you’d.
Like to create it a little bit more neat and orderly it’s going to taste the same either way I’m going to go ahead with a little more neat and orderly so I’m going to start with my strawberries and I’m going to find some of these center pieces that have a real pretty shape so I’m going to start by just pushing a strawberry with the pointy side down.
Into the jar and I want to loosen up some of my cake squares so that they’re easy to grab and we’re going to be doing two layers of cake so you can kind of divide your cake in half to know how many pieces you have to work with so next I’m going to put a square of cake and I’d like to use the side of the cake cuz the color is a little bit lighter.
And then I’m going to alternate with another triangle of strawberry and another cake piece and another triangle strawberry or strawberry triangle so now that the edge is done we can go ahead and fill in the Middle with more of our cake cubes so we just go in and push those down into our cream this definitely feels more like art than food.
Now we want to add in a layer of our banana pudding and this was just out in the freezer so I’m just going to go ahead and give this a quick stir we can just see what a really nice consistency this is now I’m just going to kind of take some clumps of it and then just kind of lay them across my cake and it’s okay that it doesn’t cover the cake.
Completely because it’s going to be mixed into all the bites and will be absolutely delicious now because this is real banana and natural banana color it’s not going to have that bright yellow color of a normal banana pudding and so I’m not going to have it close to the edge so it’s showing I’m going to keep it towards the middle so it just.
Kind of Blends in with the cake so it will be a delicious bite all right now we can add in our blueberries and we didn’t have to prep these other than rinse them off first so what we want to do is take our blueberries and we want to line them against the glass right above our strawberries and our cake this way we’re going to get that beautiful.
Blue color on our sescape of our trifle dish I’m not sure if sescape is a word but it is now copyright me this dessert is all about the sides now that we’ve gone all around the edge with the blueberries we’re ready to repeat our layers so we’re going to take about half of our cream that we have left over again just kind of plop that right in.
The middle and then we’ll gently push it out towards the edges which will help to push the blueberries against the glass so we want to have a continuous white layer all around the edge of our bowl and now to start our next Strawberry Layer we want to alternate where they were below so then we can look down on the side and just push a strawberry in.
That’s in between the strawberries down below and now we can fill in with with more of our banana cubes now one of the funnest parts of making desserts is being able to sample it as you go and with this dessert you can’t exactly just take out a scoop without anyone noticing so I’m going to go ahead and make a nice little mini trifle that’s layered in.
This jar so before I run out of ingredients I’m go ahead and just send some cream down in the bottom and some pieces of cake and a little bit of our banana pudding some blueberries and I’m saving that for later and then now on our trifold we can add the remainder of our banana pudding and again we’re just going to kind of lay this into the.
Center because i’ prefer to have it not showing through on the edges now we want to add our next layer of blueberries which is just around the edges then now we can dump on the rest of our cream and we have nice smooth canvas to put our amazing star on top now of course you could just create a really beautiful mound of berries on top.
But I’m go ahead and create a really patriotic blue star surrounded by strawberries so the easiest way to do this is to use your finger to measure about an inch and we’re first going to place the five corners of our star so we just want to divide this into five parts so again putting it about a finger in from the edge and then you just kind of.
Eyeball them till they look nice and even now we’re just going to start creating a line with our blueberries in towards the Center okay now that we’ve got the basis for our star we go ahead and start filling in to create those Peaks so we’ll go to like maybe two blueberries across and then just one out at the corners so now we’re going to.
Take our strawberries and we have all these triangular shapes and we’re going to start with one triangle that goes right into that inner Peak inside of each of our stars and then now we can take more pieces and we’re going to keep them all with the points going inside we’re just going to place them right against Our Stars great so now we can.
Take more strawberries and we’re just going to go around the entire trifold just filling it in and we can put them all just side by side and if you have some of these smaller pieces can go right underneath the peak of your star all right and now that we’ve filled in all our strawberry pieces we can go ahead and fill in with.
A few more blueberries to try and cover up as much of that white cream cheese whipped cream as we can okay done well that looks amazing it was so much fun to make I am so glad I made a sample cup because I am dying to try this so I’m going to dig in and make sure I get a bite with some of the banana cake M that is so delicious that tastes.
So fresh and full of flavor so not only is this emotionally satisfying cuz you’re eating such a beautiful and festive dessert but it’s also physically satisfying because it’s made gluten-free without any artificial sweeteners or sugar or white flour and there’s only 16 g of sugar per serving so not only will you feel great while eating it but.
You’re also going to feel great afterwards and you could easily make this ahead of time and then let it sit in your fridge up to several days well thank you so much for hanging out with me today to make this impressive dessert and if you’d like to see the full recipe card click on the link in the description below which will take you to.
My website which is gentle tm.com and if you know someone else who would love to have a healthy gluten-free patriotic dessert please share this video with them and I cannot wait to have you with me again in my kitchen next time