Discover a simple recipe for easy gluten-free sandwich bread that’s perfect for any meal. Enjoy delicious, homemade bread without gluten!
Deliciously Simple and Perfectly Soft Gluten-Free Bread for Every Sandwich
This Easy Gluten Free Sandwich Bread recipe, crafted by Kat from The Loopy Whisk, stands out for its simplicity and effectiveness. The detailed instructions and ingredient substitutions make it accessible for anyone looking to create a gluten-free bread that rivals traditional options. With a perfect texture that is both soft and flexible, this bread is an excellent addition to any gluten-free diet, providing a satisfying alternative without compromising on taste.
The recipe includes a variety of gluten-free flours such as tapioca starch, millet flour, and sorghum flour, allowing for customization based on personal preferences. Key ingredients like whole psyllium husk, instant yeast, and xanthan gum contribute to the bread’s structure and flavor. With clear measurements and straightforward steps, even novice bakers can successfully create this delicious sandwich bread at home.
Wholesome, Fluffy, and Effortlessly Delicious: Your New Go-To Gluten-Free Bread!
Hey there welcome to the channel so we haven’t made a gluten-free bread in a while so today we’re making this one it just came out of the oven it is from the loopy whisk cat had a new recipe over there that I’d not made yet so today we’re going to make this easy gluten-free sandwich bread I’m Jamie with Savory saver I share gluten-free.
Recipes tips tricks and resources to make your gluten-free lifestyle easier so please consider hitting subscribe and stick around to the end so we can see how this came out let’s go over a few recipe tips before we get started her recipes really do come together pretty easily so I’ve prepared everything that I could in advance to help you guys out.
You don’t need to see me pour stuff into bowls necessarily so the recipe tips that I have so far first of all her recipe is three pages when I print it and do not let that scare you she gives really good instructions they’re detailed but they are not difficult so three pages may look like a big recipe but it’s really good.
So don’t let that deter you cat’s recipes also are done by weight as well as by volume so most of everything that I did today I weighed out just because if I was doing this and not filming it for you guys it would make less dishes it is also more accurate so if you’re used to baking like us Americans do by volume then go ahead and start teaching.
Yourself to bake by weight especially gluten-free now I find myself going back back and forth between the two it’s just more accurate because all those different flowers will settle and they weigh different and measurements become different and it’s just a more accurate way to bake gluten-free especially on that bread I will be going through the.
Ingredients as I use them but for reference they are listed Down Below in the description as well as a link to her original recipe in case you want to go over there and print it and make it also this is a blend of gluten-free flowers and zanon gum and celium H all of that stuff is listed below in the description to make our bread I’m going.
To start by mixing the dry because I need to whisk it together and I’m going to use this whisk for the pelium gel that she likes to use in her recipes so I’m doing it a little bit out of order but no big deal I’m just trying to save myself a dish or two I am going to use the stand mixer for this recipe you can do it by hand but the stand mixer will.
Make it easier for me so to the bowl of the stand mixer I have 230 G or 2 cups of tapioca starch 135 G or 1 cup of millet flour I’m also going to use millet flour to dust the board down here so I’ve got some more of that off to the side I’ve got 60 G or 1/3 of a cup plus 2 tbspoon of sorghum flour now one thing with cats recipes that I really like if.
You actually go to her website and read the directions she gives all the substitutes that you can use when you don’t have something so for instance she says that for the tapioca starch if you don’t have it you could also use an equal amount weightwise of corn starch potato starch or aerrow root starch so if you don’t have all of these.
Ingredients go ahead and check out her recipe because it gives you the substitutes that you can use in place of something for the rest of the dry ingredients I’m going to add 50 g or four of a cup of granulated sugar 8 gram or 2 and 1/2 tpoon of instant yeast she does give instructions for dry active yeast in her recipe if you’re using that.
Instead of instant 8 G or 2 tpoon of baking powder 7 G or 2 and 34 TPO of zanth gum and 12 G or 2 tpoon of salt give it a whisk let’s put this to the side for just a second now I’ve got a measuring cup with some lukewarm water in it it’s 1 cup and 2 and 1/2 tablespoons or 280 G so my water is between 115 and 120 degrees Fahrenheit.
To that I’m going to add 17 grams of psyllium husk powder and I do not have the tablespoon equivalent for this she actually uses whole celium Husk in her recipe and this is the substitute that she gives if you don’t have whole celium husk I’m going to whisk this together and give it about 30 to 45 seconds to form a gel.
So while that does that I’m going to start setting up my stand mixer and we’ve got to add some additional liquid ingredients to this before we mix everything together so I’ve got a nice thick gel here and I know it doesn’t look super appetizing but we’re not going to worry about that because it gives us good.
Results so I’m going to add the rest of my wet ingredients to the celium hus gel which is why I used a big container I’ve got two eggs that are room temperature these are large eggs I’m also going to add half a cup or 120 g of lukewarm milk again about 115° or so I’m using whole milk use whatever milk you have I’m also going to add two.
Tablespoon or 25 G of a neutral oil so I’m using canola use vegetable use sunflour whatever your neutral oil is of choice let’s whisk it together all right think we’re good on the whisking so let’s go through the next step of the process so I’ve got my mixing bowl on here and I’ve got a well created in the center to add that pelium husk gel.
Mixture that we just made I’m going to be using the dough hook and it’s going to need for four to 5 minutes and you want to scrape the bowl down and the dough hook if needed a couple times I usually try to do it at least halfway through a mix if not maybe a third of the time just depending keep an eye on it so let’s put this in.
Here while this is mixing I’m actually going to use her method for a warm environment so I’m going to boil some water and I’m going to put about a cup of boiling water in a glass container and put it in the oven so the bread can rise properly so let’s get it mixed up I will probably end up somewhere between 4 and 6 maybe as far as the speed on my.
Mixer so we’ll see how that goes so it’s been 5 minutes I did 2 minutes scraped the bowl another 2 minutes scrape the bowl and then a final minute mix so I’m going to clean off the dough hook and get it ready to put on the board all right cat says we are going to shape this on a heavily flowed board so I’m going to use millet.
Flour Oliver’s home with me today and he’s come out to check things out so I’m hoping he behaves himself until I can get this shaped Let’s Get It On The Board all right it’s all on the board cat does say if it’s too soft and sticky and it’s hard to manage that you can chill this for about an hour in the fridge and then move to.
The next step I’m going to try to do it without I’m hoping the flour helps I do have a 9×5 in bread pan this does not need to be greased which is nice doesn’t need to be buttered so we’re just going to put it in here so I’m okay with that I’m going to dust the top with a little more millet flour now I’m going to gently knead it into a.
Ball so I’m just taking it and kind of folding it over on itself it is sticking a little bit but I’m going to wash my hands in a minute I think if I need to Let’s flip it over I’m okay with that that’s a ball so it’s you know it’s actually less sticky now that I’ve needed it so now I’m going to shape it into a loaf shape so let’s.
Gently do that I’m going to wash my hands off real quick because I think I’ll have an easier time lifting it up into there we’ll see okay now we have to get this into this and we want it to fit snugly so I’m going to lift it up and get it in there let me get a dough scraper all right not too bad little bit moved.
On me but now I’m going to gently press it down into the pan cuz it says snugly so I’m assuming that means I can do this now we’re going to give it three sharp diagonal slices that helps steam Escape as it bakes so let’s do that now I’m going to Loosely cover it with plastic wrap that’s going to help.
Keep it from drying out now for the rise so I’m going to use my oven to do that so the oven is off I’ve boiled some water I’m going to put a cup of boiling water in here and just put it in the oven next to the bread as it rises this is going to take anywhere for an hour to 15 minutes to an hour and a half to rise cat says after 45 minutes that we need.
To preheat the oven so while this does the first part of the rise I’m going to take the dog out I’m going to clean up some of these dishes and and in the end of the 45 minutes we’ll keep going with the instructions so while I wait let’s jump you ahead so we have not even been 45 minutes into the rise time I think I’ve Got 5 minutes left on my timer and.
I think the bread is pretty much where I need it so I’m going to pull it out and preheat the oven so for baking what you want to do is you want to move your oven racks to the lowest part of the oven I’m using a pizza stone I’m going to bake it in the pan on the stone so I’m going to preheat that at the same time cat also says if you don’t have a baking stone.
You can use a stainless steel peel if you have a stainless steel one or you can use a heavyduty baking sheet so you can do that as well so throw one of those heavy pans into the oven that is oven safe of course and preheat that to 400° and what that’s going to do is it’s going to make sure everything’s cooking evenly and it’s going to give it.
Probably a quicker bake would be my guess as far as initially so let me show you what the bread looks like and preheat the oven I am going to leave this covered while the oven is preheating to 400 and then we’ll take a closer look at it but you can see these scores that I’ve made they’ve done a really good job of helping it rise it is.
Definitely doubled in size I have one egg white here off to the side I’m actually going to brush this with beaten egg white just before it goes into the oven so once the oven preheats we’ll get this in there and we’ll go over any final directions all right let’s get this in the oven before it rises anymore I’ve got my.
Beaten egg white and you want to beat it until it’s pretty frothy because you really don’t want it probably could go more the better that you beat this egg white the more evenly it’s going to spread across that so you want to beat the heck out of it because you really don’t want big stringy pieces of egg white because it’s not going to Brown.
Evenly all right now you gently want to brush the entire loaf with it so it’s been coated with the egg white now we need to bake it so the oven again is at 400° F I’m going to place this directly on that baking stone to bake it it’s going to bake for an hour to an hour and 10 minutes the bread should be a deep golden brown on top and it says.
The bottom insid of the crust should be crisp so cat has a tip for that when you pull the bread out of the oven if the sides and the bottom are not as crisp as you would like you can throw it back in without the pan on that stone for about 5 to 10 minutes to crisp everything up so we’ll see if I end up doing that or not the other thing she says is the.
Bread should weigh about 960 to 970 G I’m not going to do that step but what that tells you is if the bread is at that weight somewhere in there enough of the moisture has baked out of the bread so it’s going to be done let’s get this in the oven and get it baked off and once it’s done I’m going to move it out of the pan and onto a rack to cool.
completely so it’s been an hour this is what it looks like I did cover it with foil about 35 minutes into the bake time because I thought it was pretty dark let’s get a wait on the bread I wasn’t going to do that but I’ve not done that before so let’s do a wait and see where we’re at.
All right it slid right out of the pan we are at 942 G I’m going to assume that we are done it’s pretty crisp on the side but I think I’m going to do it another four or 5 minutes just for the heck of it and see what it does then I’m I’m going to let it cool completely and we’ll slice into it and give it a try.
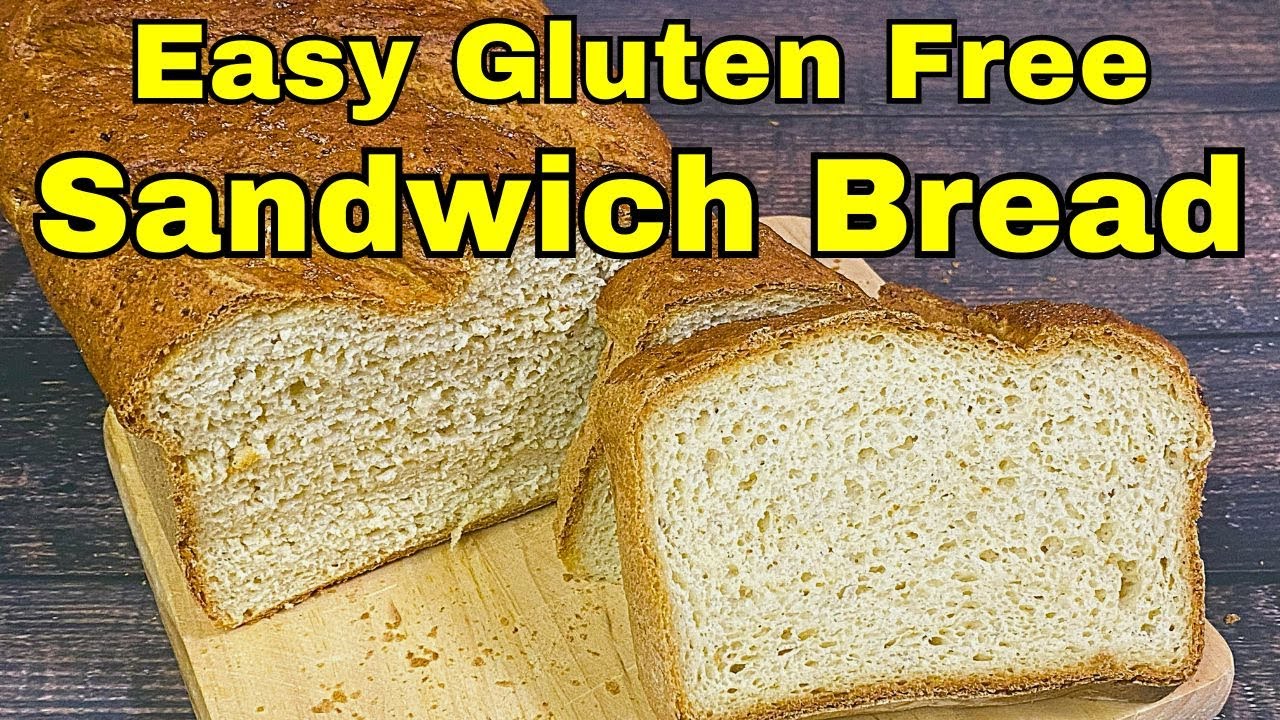
Okay bread is cooked cooled time to look at it and taste it so here’s what it looks like look at that nice deep cuts that helped it rise properly as well as bake properly crusty outside the inside look at the crumb it looks really good I honestly don’t even know if I see anything that.
Doesn’t look baked on the bottom cuz you guys know how that starch level at the bottom is sometimes really good there is a slic piece it’s got Flex I can squish it I really like the look of it the smell of it smells like regular bread very nice here’s my cutting skills not always good at doing that that’s fine not worried about it okay.
This is my piece half without butter half with butter and it is the heel because tera’s not going to eat that so might as well do it myself that is a good loaf of gluten-free bread nice chew nice crust it’s not dry nice and soft in texture that’s some good gluten-free.
Bread okay let’s go over some recipe tips if there are any this time I think I went through them as I did it so let’s start with the ingredients all individual flowers I know that’s not something that everyone wants because then you have multiple bags or containers or whatever all over your house like I do we I think we probably.
Have 10 or you know 10 or 15 gluten-free flowers between the Blends and the singles but that’s how it goes here anyway so individual flowers loopy whisk cat does a great job giving substitutions so if you don’t have one flour or starch there’s probably another flower or starch that you can use in her recipes love that her recipes are easy.
To follow I like that she is very detailed in them but they are not difficult so do not be afraid when there’s three pages of print not with her recipes anyway I have not found anything wrong with having a three-page recipe from cat very good instructions shaping the bread fairly easy I didn’t really have a whole lot of issues with.
It it is a soft sticky dough but flowed hands definitely helped with that once it was in the pan all we had to do is rise and go with it that’s the beauty of an instant yeast so I really like that I didn’t have to do much else with it baked time it did bake for an hour after the rise and I did let it go for about 4 minutes out of the pan on the actual.
Baking stone I don’t know if I can tell much of a difference with that so maybe I should have gone longer but the outside was still done at that point so that was a choice on my part to do that I baked by weight this time it was under the weight that she suggested so I don’t know if that’s right or wrong but it doesn’t taste bad so I’m okay with that.
Let’s go over storage cat says that if this bread is in a sealed container and wrapped up well she says in a cool dry Place it’ll last for 3 or 4 days at root temperature that’s amazing and it self because as you know gluten-free breads tend to dry out really quickly so I like that about her recipe she does say you don’t have.
To reheat it before serving during those 3 to 4 days either which another thing usually this becomes toast on day two so I like that she’s telling us it’s going to be soft for a few days if you’re not going to eat it right off or maybe even in the next couple days my suggestion would be to slice it all up and get it frozen sooner rather than later guys I.
Don’t know what else there is to say about this gluten-free bread recipe one thing I do want to say though is that I’m always looking for a good gluten-free recipes so if you have a gluten-free bread recipe or maybe a gluten-free dinner idea or whatever you can always send me an email my email address is on the channel page so feel.
Free to send me your recipes and maybe we’ll do a recipe on the channel here always looking for recipes for Taran and I always looking for bread type recipes for you guys that are gluten-free because we all know it’s the never ending search And in regards to anything else leave your comments Below guys I want to thank you so much for watching.
That’s all I’ve got for today and I hope to see you in the next video