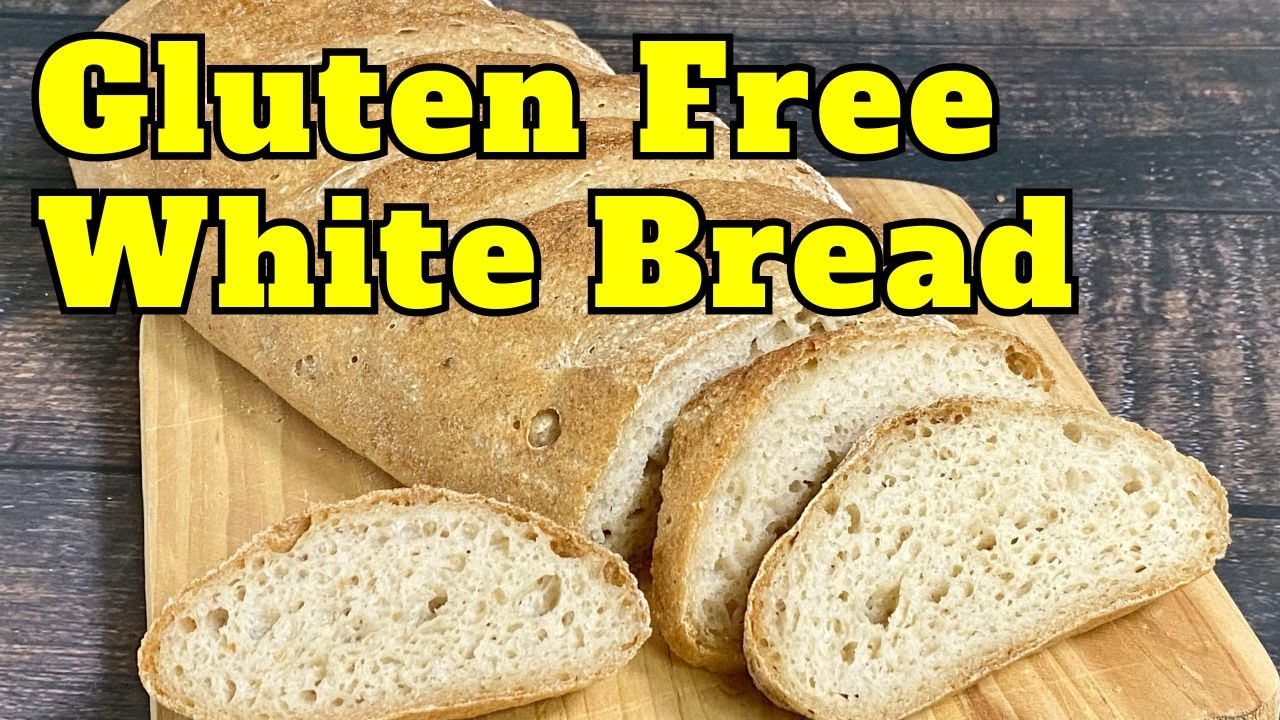
This Gluten Free White Bread Recipe from The Loopy Whisk is easy to make and tastes amazing! Find all the ingredients easily in your grocery store. A must-try recipe!
Easy & Delicious Homemade Gluten-Free White Bread Recipe
This Gluten Free White Bread Recipe comes from the blog The Loopy Whisk. I really like the way Kat at the Loopy Whisk handles gluten free baking. She is always informative and provides a TON of tips with her easy to follow recipes. I was really excited to try this recipe and the results didn’t disappoint. I have nothing bad to say about this recipe.
The recipe is easy to make, it had ingredients that are easily found in your grocery store and online. Most importantly, this Gluten Free White Bread tastes AMAZING! It is definitely worth your time in making it.
Ingredients:
- 20 G (4 Tbs) Whole/Rough Psyllium Husk (If Using Psyllium Husk Powder, Use 17g.)
- 360 G (1½ Cups) Lukewarm Water (About 100ºf)
- 145 G (1¼ Cups) Tapioca Starch (You Can Use an Equal Weight of Cornstarch (US)/Cornflour (UK), Potato Starch or Arrowroot Starch Instead.)
- 145 G (1 Cup + 1 Tbs) Millet Flour, Plus ExtrafFor Flouring the Surface (You Can Use an Equal Weight of Finely Milled/Ground Brown Rice Flour Instead.)
- 50 G (⅓ Cup + 1 Tbs) Sorghum Flour (You Can Use an Equal Weight Of Light Buckwheat Flour, White Teff Flour Or Oat Flour Instead. Use The Latter Only If You’re Not Sensitive to Oats.)
- 15 G (1 Tbs) Granulated Sugar
- 8 G (1½ Tsp) Salt
- 6 G (2 Tsp) Instant Yeast (If Using Active Dry Yeast, Use 8g.)
- 15 G (1 Tbs) Olive Oil
- 8 G (1½ Tsp) Apple Cider Vinegar
- 1 US Large/UK Medium Egg White, Whisked, For Brushing The Bread Before Baking
GLUTEN FREE WHITE BREAD | Loopy Whisk Gluten Free Bread Recipe | Video Transcript
Welcome to the channel so I just bought some new yeast in fact I bought a lot of new yeast this is just one of the two pack that I just bought so 2 lbs of yeast what does that mean that means it’s time to make some gluten-free bread in fact let’s make this loaf of gluten-free bread he that crust I’m super excited to.
Cut it into this and give it a try but first I want to show you how to make it I’m Jamie with Savory saver I share gluten-free recipes tips tricks and resources to make your gluten-free lifestyle easier so please consider hitting subscribe and let’s get to baking so before we get mixing up our bread dough and get that started let’s.
Go over the recipe a little bit so it is from the website the loopy whisk I have made one of her recipes before I think uh love The Way She lays out her recipe with the instructions are easy to follow ingredients are easy to find and she gives both weight and volume measurements so today I am baking by weight but don’t worry all the.
Ingredients in weight and volume will be listed below in the description as well as any ingredients that you may have trouble finding she uses all individual gluten-free flowers but nothing is difficult to find either in your grocery stores or on online it’s three pages of instructions and recipe but again don’t let that.
Intimidate you they’re very easy to follow she also does really good with leaving tips and one of the things I really like about cat in her website is that she explains how to use things like xanthan gum and psyllium husk and what she likes to do in regards to if she’s making her own recipe on how much of those she she uses depending on how many.
Of the flowers she’s using so if you like to get into the science of things like I would like one day to be able to bring you guys recipes that I have developed myself and not necessarily someone else’s then it’s a great website to look at she also has a cookbook available if you want to look into that okay enough chatting about the recipe so.
Let’s make this gluten-free bread so the first thing that we need to do is we need to actually make our pelium husk gel this is one thing that cat does that lots of other recipes I look at do not she actually takes her water she hydrates her pelium husk into the water and then moves forward with the recipe so I’ve got 360 G of lukewarm water it’s.
About 100° or so and it’s about a cup and a half of water if you’re looking for those volumes and to that I’m going to add 17 G of pelium husk powder and Cat uses whole or rough celium husk but she does adjust the amount down when you’re using powder so let’s give that a stir she says after 30 to 45 seconds this will turn into a gel so I’m going.
To try to break it up just a little more and then we’re going to get our dry ingredients together you can already see how thick that’s getting already and I haven’t done hardly anything to it so let’s put this to the side and let’s get our dry stuff together so I am going to be using the KitchenAid to make this.
Dough she does say you can do it by hand I’m going to do it a little faster with the kitchen aid you are going to need your dough hook attachment so to the bowl of the mixer let’s get our dry ingredients in there all right these ingredients are by weight and the three gluten-free flowers that I’m using are all Bob’s Red Mill so remember.
Glutenfree flowers are all a little different even from type of flour to type of flour so you may get different results depending on what you’re using or you may get different results cuz you’re a better Baker than I am too so don’t forget that part okay to the Bowl 145 G of tapioca starch 145 G of millet flour 50 g of sorghum flour I’m also.
Going to add a tablespoon or 15 G of granulated sugar 1 and 1/2 teaspoon or 8 G of salt I’m going to whisk everything now and that’s because I’m getting ready to add my yeast and I just want that salt mixed in so it’s not too close to the yeast or all of it’s not on top of the yeast cuz that can affect your results now I’m going to add our yeast.
This is instant yeast and you guys just saw the packages weren’t even open so I’m not even going to test it to make sure it’s good because it doesn’t expire till 20125 so it better be good so we’re going to add 6 G or 2 tasps of instant yeast I’m going to give it another quick whisk I’m using the dough hook so remember it’s going to mix it but it’s.
Not really going to incorporate everything dry at this point next you want to make a little well in the center because we’re going to add our wet ingredients so we’re going to add all of our gel that we just made and see how thick that is that’s pours right out I’m going to add a tablespoon of olive.
Oil a teaspoon and a half of apple cider vinegar now we’re going to get this mixed up those are all the ingredients at this point all right our dough hook is on you want to knead the dough until it’s smooth and everything is incorporated of course get that silicone spatula handy because you want to scrape the sides and the bottom to make sure we.
Are getting everything mixed in you want to mix this until the dough is smooth and supple with no lumps according to cat everything should come away from the the side of the bowl and it shouldn’t be sticky to the touch so let’s get it mixed up and I’ll try to give you guys an estimated time on how long that’s going to.
Take start the mixer on low and then you can probably bump it up to maybe level four on your stand mixer you don’t want it too fast so everything’s flying out of the bowl but you can probably do it medium low to medium all right guys we’re about 2 minutes in and it has really come together nicely.
It’s not smooth yet but it’s looking really good so let’s raise it up and just give everything a good mix from the bottom yeah I’ve still got some dry flour in there so let’s give everything a turn all right let’s keep mixing so the dough has been kneading.
For about 7 minutes or so it is pulling away from the side of the bowl still and cat says it should not be sticky when touched gently so I don’t have hardly anything on my fingers if you are needing this by hand she does say that it will stick to your hands as you’re kneading it so you don’t want to add any more flour.
To it at this point and I’m getting minimal sticking since it’s pulling away from the sides of the bowl and we’re getting that effect at the end I would say this is ready to keep moving forward so I’ve put the dough on my baking mat I like using this because it keeps the counter a little cleaner and this is non-stick.
I’ve also put a little bit of gluten-free flour down she says to lightly do this cuz we don’t want to incorporate too much of it into the dough I’m just just using brown rice she suggests millet flour but she says you can use other flowers as well so I’m using brown rice because it’s a little more cost effective than the millet.
Flour millet flour is a little more expensive sometimes it does say to roll it out we’ll see if it sticks for me at this point cuz this is where I usually have issues we’re going to roll it into a rectangle you want it about 11 in long by 7 or 8 in wide so let’s see how we do with that not getting much sticking think I’m.
Going to take my band off just in case one less place for it to stick let’s get to Rolling okay I’m getting some tearing so that’s probably because I’m rolling too forcefully so I’m going to lighten up on my rolling so let’s roll a little more.
Gently all right I know I should be be using this guideline but I’ve got the measuring tape we are at 11 perfectly by 8 that will not happen on this channel again that I actually roll it out basically by looking at it and it’s the right size I’m not the best roller now we need to do one more roll.
Because cat actually rolls up the loaf of bread and this is a technique that I’ve seen on regular you know bread with gluten in it so I think this is a great way to shape the briad so you want to start on the wide end and we’re going to roll it either towards you or away from yourself so I think I will try to roll it towards me and see how that goes you.
Want to be gentle and then if it’s sticking a little bit of course the mat actually is very helpful with that but it doesn’t look like I’m having any issues with it look at that everything is lifting up and it’s now the loaf shape that I need now I’m going to roll it totally.
Over because I’m going to pinch the seams together and it does seem like it is sticking together so that’s good and then we’ll make sure that the seam is down so one thing that cat did that I did not do cuz I’ve kind of got the recipe next to me and I’ve got my computer up with the blog post is she.
Actually every time she rolled she made sure to push down as it rolled like into the dough so she would roll it push the dough at the seam down into itself I did not do that we’ll see if that’s an issue so the final thing we need to do for this is we want to make sure we pinch these seals together because you want about a 10-in loaf so I’m going to try.
To squeeze that together and shape it a little bit kind of push it under I think same thing on the other side I have to tuck it just a little bit I think that’ll be all right guys I think I have my seals all closed but can you see what a good loaf of dough that is it’s gluten-free and.
While I know it’s gluten-free it looks like regular bread dough to me which is amazing so it looks this good now I’m really hoping that it looks even better when it comes out of the oven now we are ready to proof so let’s get this onto a baking sheet so it can do its job I’ve got a large baking pan with a piece of parchment paper so I’m going to transfer.
My dough to that let’s do another measurement so it’s a it’s about 11 in so I’m just going to condense it a little bit now that it’s on the pan we need to get this proofed so I’m going to cover it lightly with plastic wrap cat does not.
Say you need to use a greased piece of plastic and I agree this dough is not sticky so I don’t think we’re going to have any sticking issues we just want to make sure the dough doesn’t dry out okay you want to proof this in a warm spot of course and I usually use my oven for this so it’s going to take about an hour but I need to preheat the oven as well.
So I’m going to give the rise a jump start because my kitchen is cool so I’m going to put it into an oven that was set at its lowest preheating setting for about a minute or so I turned it off so it’s a nice warm place without drafts so I’m going to pop it in the oven for probably 30 minutes then I’m going to take it out and proof it the rest of the.
Time on my counter because I’m going to have to preheat the oven so I’m going to let this proof and then once I bring it out to the counter for the remainder of the proofing time I will show you what we’re going to do to prepare the oven for baking this cat says you can either use a pan like this or you can use a heavyduty baking sheet that gets heated.
In the oven or a baking steel so I may switch this to the pizza stone and bake it on that because it’ll give you a little more spring and it’s going to make that crust a little crispier so I may do that I’ll think about that while it proofs and we’ll go from there but very EX about this let’s get this proofed the first 30 minutes of our rise.
Is just about up and I am very excited I just peaked in the oven door and am very impressed I can see the rise which I can’t always see in gluten-free items so I’m very excited about this I have decided I am going to use my pizza stone but don’t worry cat says you still get a great loaf of bread even if you do it on the baking sheet so let’s get the oven.
Ready and then we’re we’re going to finish our rise time all right so here’s the rise I don’t know if you guys can see the light’s a little bright but I can definitely see that it’s increased in size so I’m just going to leave it on the camer at this point because I need to preheat my oven now let’s get you down to the oven so you can see how you.
Need to set this up all right so the oven here so cat is doing some steam with this bread and that’s a great tip because a lot of times it helps that crust crisp up and it gives a little bit of moisture in the oven so I’m going to do it with this I usually use a broiler pan and I’m excited about this instead because then I can take it out after for.
It to cool and my broiler pan always gets gross and hopefully with this I won’t even notice it so I’m going to put this in the bottom I’ve got that on the lowest shelf in the oven this other one I keep my oven rack in the middle most of the time she says to go low with it so we’re going to do Low Middle.
That’s going to give me just enough clearance for that and I’m going to put my pizza stone in because I am going to use it on this all right now it’s time to preheat the oven cat actually uses two temperatures for this she starts it at 425 and then when we put the bread in we’re going to drop it down to 400 so.
Let’s get it preheated to 425 it is going to be about a half hour oven preheat because we really want the oven to be nice and hot when that bread goes in it so it’ll start baking so I’m going to put the oven to 425 set a 30 minute timer we’ve got one no two quick things we need to do the bread dough just before we put it in the oven so let’s.
Jump ahead get that done and get this baked this glutenfree white bread dough is definitely doubled in size so let’s get it finished up up prep wise and get it baked so let’s see if it’s stuck to the plastic wrap peeled off perfect so that’s great I am going to try to transfer it to a pizza screen because I’m going to bake.
It directly on the pizza stone so let’s see how bad this is I’m try to be very gentle with it oh I don’t need to be it actually was really firm so what I’ll do is I’ll use the pizza screen to help me slide it off and I’ll bake it right on the parchment paper and the pizza stone all right so.
The last thing we need to do before we can put it in the oven is you want to take one egg white this is from a large egg and I whipped it for a minute or so to break down that egg white cuz I don’t want a great big p piece of it on here so I’m going to brush this with the egg white and then what I’m going to do is you want to put some slices in the loaf.
And that will help let steam Escape through those so I’ve got a really sharp straight edge knife and cat says that you want to put 5 to seven diagonal slices in the bread loaf so let’s get this brushed get it cut and get it baked make sure you get all the way around all the way down to the bottom of the.
Bread cuz what I find with me is when I brush things I like to forget either the very bottom or a lot of times the back side so sometimes I’ll actually turn the product around so I can see what I’m doing okay 5 to seven cuts on the diagonal let’s take our knife and and start doing.
Those 1 2 3 four and five they are pretty deep I probably went a good good/ inch in there again that’s going to let that steam come out of there and hopefully keep our shape I want to go over the baking.
Instructions because I want to try to show you guys this as it goes in the oven but I want to go over instructions first because I want to try to do it all in one swoop and not have to talk through it I’ve got six ice cubes that cast iron pan that we put in the bottom that’s where these ice cubes are going so I’m.
Going to transfer the bread to the oven on that pizza stone I will slide the pizza screen out I’m going to put these six ice cubes into that cast iron then I’m going to close the oven door and I’m going to drop my temperature from the 425 to 400 we are going to bake this at 400 so I’m guessing that that higher heat is going to start our baking off.
And then help everything set and then the 400 will continue to bake our bread after 15 minutes cat says to open the door to let any steam Escape so don’t open your oven for those 15 minutes and then after 15 minutes open up your oven briefly just letting any steam escape and then she says to bake the bread for an additional.
25 to 30 minutes or until the bread is golden brown now she likes to bake her bread and then she weighs it which is interesting I’ve never seen that on a recipe so she weighs her bread and says it should weigh 675 to 695 G and that corresponds to a weight moisture loss of about 12 to 13.
1.2% I don’t think I’m going to do that with this I may change my mind I’m not familiar with that that I’m going to have to look into that process a little bit more cat probably has some really good tips on that once it comes out of the oven I am going to cool it to at least lukewarm because we want the bread to finish.
Doing its thing so let’s get this in the oven so we can get it cooled so I can taste it my timer is just about ready to go off for the first 15 minutes of the baked time so I’m going to open the oven take out that cast iron pan close the oven back up and bake the bread for another.
25 to 30 minutes until it’s golden once it’s cooled down we’re going to try this out here is our finished bread it is super golden I did do a couple cuts but I want you to listen to How crusty this sounds and then I’m going to show you the inside and then we’re going to taste it it’s crusty on the outside it’s soft on the.
Inside this is what it looks like look at that crumb look at that look at that bend let’s try this gluten-free white bread can you believe the way that bread looks on the inside it looks like regular bread with wheat flour and it’s not so I’m going to cut this piece in half look at.
That I’m super impressed with this today was a good baking day as long as this tastes good all right let me cut this in half because you guys know I like to do some without butter and some with butter so I’ll be right back here we go here’s the piece of the bread without any.
Butter okay first thing is this tastes like regular bread I can’t really tell this is gluten-free and you guys know that I eat gluten tear does not okay spoiler alert I don’t have anything bad to say about this that was a good slice of bread I really can’t tell again that.
It’s gluten-free it tastes really good the crust is a little crisper than the inside the inside is chewy guys you can see that crumb look everything’s pretty even there’s a couple bigger holes there’s a bigger hole here but for the most part it’s a nice even texture all the way across the.
Crust top and bottom is golden let me show you the whole loaf there’s the bottom there’s the top these did their job I didn’t have any other splitting anywhere else if I want to be critical and really on this bread I don’t but there is a little bit the tiniest.
Amount of you know that bottom starch thing that lots of gluten-free breads have but it’s so little like I probably could have cooked bread for five more minutes and taken care of it I don’t know guys I have nothing bad to say about this bread this recipe was really easy to work with you guys know.
That I like to complain because stuff sticks all over the place so if you watch any of my videos that’s usually my biggest complaint with gluten-free bread Doe’s and stuff like that I didn’t have that problem with this the instructions are easy to follow the ingredients are easy to find the tips alone on do this instead.
Of this or swap out this for that great written recipe from cat over at the loopy whisk let’s go over the storage cuz cat with all her great tips also tells us how to store it she says this bread keeps for 3 to 4 days so let’s not even talk about it drying out in the morning you should get 3 or 4 days out of this she says to store it in.
A bread box a paper bag or wrapped in a clean dish towel in a cool dry place after that she does recommend toasting it so looks like you might have a sandwich bread on hand I totally think this would be a great for a sandwich I can’t speak for the next day or so on how fast it’s going to dry out I can tell you uh two of my viewers you know.
Who you are Brenda racer girl if you’re watching this I know you two girls are going to run over to Costco and get yourself two loaves of bread at Costco totally okay with me cuz I appreciate all the feedback you guys are always giving me and I know you don’t like to do bread recipes it’s fine I’m fine with that I love y’all thank you for.
Watching Tara is probably going to make me bake this bread she’s probably going to have a sandwich with it it is sandwich quality I I don’t know what else to say about this bread I very excited about this guys that’s all I have on this video ingredients are listed below a link to cat’s full recipe is listed below I’ve got a list of.
Ingredients and tools that you may need you can find the flowers down below as well as if you want to look into getting a pizza screen or a pizza stone I use a pizza stone a lot more so even now than I ever did when I was baking with gluten um I will find cat’s cookbook if you want to look at that uh it’s been out for a while so this recipe is probably.
Not in there but if the rest of her bread recipes speak like this one then it may be one worth getting guys I want to thank you so much for watching as always I appreciate it please come back and see the next video because I hope to see you then