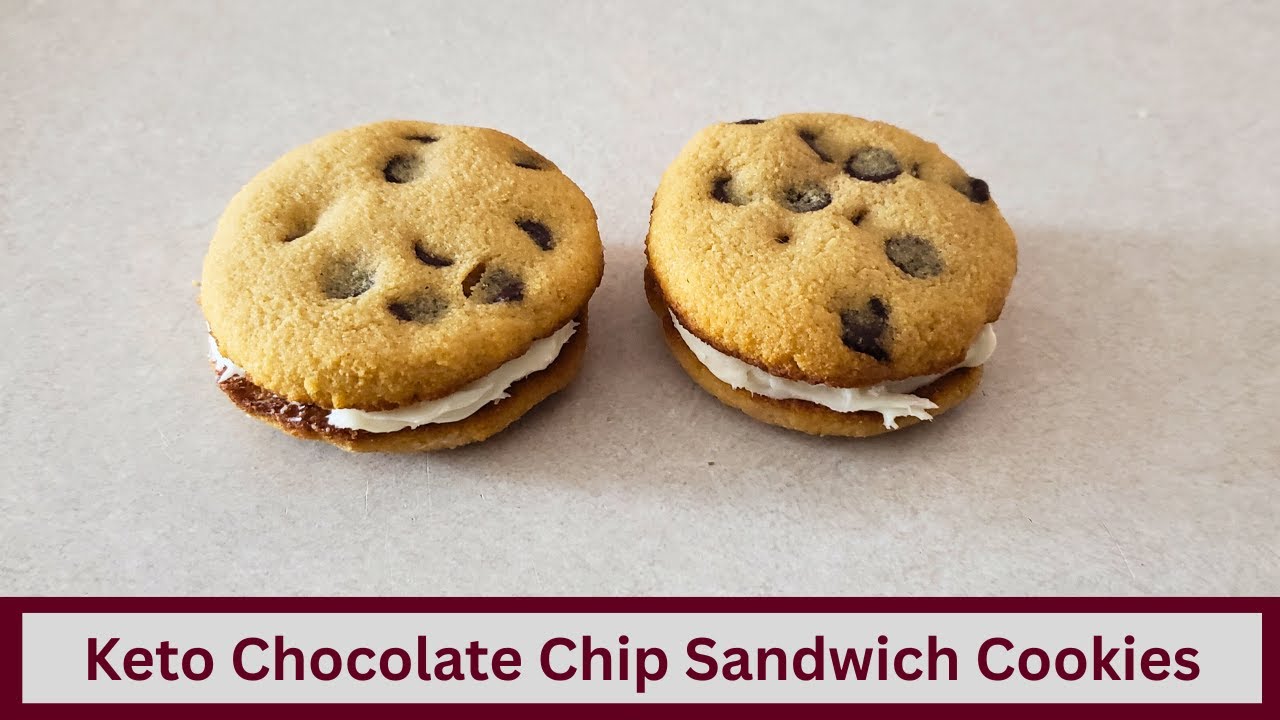
Indulge in delicious Easy Keto Chocolate Chip Sandwich Cookies, nut-free and gluten-free. Perfect for satisfying your sweet cravings guilt-free!
Deliciously Low-Carb Treats for a Guilt-Free Indulgence!
This recipe features easy keto chocolate chip cookie sandwiches that are perfect for anyone following a low-carb diet. These cookies are not only keto-friendly but also nut-free, gluten-free, and sugar-free, making them suitable for those with dietary restrictions, including diabetics. The use of coconut flour in the recipe enhances the texture while keeping the carb count low, ensuring that you can indulge in a delicious treat without compromising your dietary goals.
The simplicity of this recipe makes it accessible for bakers of all skill levels. With a few basic ingredients, you can create delightful cookie sandwiches that satisfy your sweet cravings while adhering to your keto lifestyle. Enjoy these cookies as a snack or dessert, and feel good about your choice to indulge in a healthier alternative to traditional cookies.
Indulge Guilt-Free: Delectable Keto Treats That Satisfy Your Sweet Cravings!
Preheat your oven to 375°. Line a large baking sheet with parchment paper or a silicone baking mat. Then set it aside for a minute. In a medium mixing bowl, combine 60 g or around 8 and 1/2 tsp of coconut flour, 1/4 teaspoon of salt, a/ teaspoon of baking soda. You can use baking powder.
If you don’t have any baking soda, but you’ll need to use twice as much baking powder as you would the baking soda. So, you’d need at least one teaspoon of baking powder. I like to use baking soda in this particular recipe because baking powder makes your baked goods a little more softer and cakey in texture. And in this case, I want a little bit of a firm.
Cookie. Not crispy, but I want it firm so it doesn’t break when I put the filling in it. If you want to, you can add some dry spices if you want the cookie part to have a little bit of different flavor to it. I’m keeping mine just as is. Sip the dry ingredients all together until it’s fully combined and there are no lumps in the dry.
Ingredients. Then set it aside. In a large mixer bowl, combine a/2 cup of butter that’s been softened. 44 g or around 3 and 1/2 tspoon of the brown sugar substitute of your choice. I’m using brown monk fruit sweetener. and 25 g or around 2 tablespoons of the granulated sugar substitute of your choice. I’m using granulated monk fruit.
Sweetener. You can adjust this more or less depending on how sweet you want your cookies. Also, if you don’t want to use a mix of granulated and brown sugar substitute, you can use all brown sugar substitute or all granulated sugar substitute. I like the taste and the texture of combining the granulated and the brown sugar substitute. Beat the.
Butter and the sugar substitutes on medium for about 1 minute or until it’s fully combined and creamy. After 1 minute, scrape down the sides of the bowl and push the butter mixture to the center of the bowl. Add two large room temperature eggs and two teaspoon of vanilla extract. You can adjust the extract more or less depending on how.
Dominant of a vanilla flavor you want in your cookies. You can also change the flavor of the extract. If you want a different flavor in your cookies. If you want a maple flavor, you can use maple extract. If you want a coffee flavor, you can use coffee extract. Whatever. Make it your own. However you want to do it. Stir the eggs and the extract in.
Until fully combined. Gradually add your dry ingredients to your wet ingredients. Make sure you just add this a little bit at a time. It makes it much easier for it to blend all together. So add a little bit, bead it or stir it in. Add a little bit more, bead it or stir it in. If you don’t have a standing mixer, you can use a wooden spoon. It mixes.
Together very easily. Once all the dry ingredients is added and you have a smooth dough, scrape down the sides of the bowl and push the dough to the center of the bowl. Gradually fold in 3 oz or around a/2 cup of keto chocolate chips. I’m using Lily’s chocolate chips. And again, you just want to gradually fold these in so they blend easier and.
You can evenly distribute them throughout the dough. Scoop the dough out one tablespoon at a time onto your prepared baking sheet. Roll each scoop into a tight smooth ball. Press each dough ball out to your desired size and thickness. I pressed mine out to roughly around 1 to 1 and 1/2 in in diameter. Basically, kind of close to the size of.
An Oreo. These do puff up and expand. So, when mine are actually done baking, it’s going to be a little bit bigger than an Oreo. But, just keep that in mind that these do expand. So, whatever size you press these out to, they’re going to be a little bit puffier and a little bit bigger. Not a lot, but a little bit. Once your cookies are all.
Shaped, make sure you have space in between each one of the cookies because, again, like I said, these do puff up and expand, so you don’t want them molding into each other. Place the cookies in your preheated oven. Bake at 375° for 8 to 10 minutes or until the cookies are golden around the edges. Once the cookies are baked, remove them.
From the oven and allow them to cool in the pan for about 5 to 7 minutes or until they’re firm. They’re going to be a soft cookie, but they should definitely be firm enough that you can move them without falling apart. After the cookies have firmed up, transfer them to a wire rack and allow them to cool completely before assembling them.
To assemble the cookie sandwiches, turn half of the cookies upside down on a lined work surface. Spoon one tablespoon of the filling of your choice into the center of the upside down cookie. If you need to, you can use a butter knife and just kind of flatten the top of your filling a little bit. You don’t have to spread it completely. You’ll be doing.
That when you add the top cookie. Top the filling with one of the plain cookies and very gently press the cookies together so the filling can spread out and cover all the inside of the cookies. Make sure you press these very gently. Coconut flour cookies are always a little on the soft side. So you don’t want to press them super hard,.
Just enough so the filling is spreading. And once they’re assembled, place them back on your wired rack. Now you can use any filling you want to in these sandwiches. I am using a vanilla filling. So, if you want to use the vanilla filling, then all you need to do is beat together 1/4 cup of butter that’s been softened, 125 g or around 1.
Cup of the powdered sugar substitute of your choice. I like to use powdered monk fruit alulose blend, and a half tbsp of vanilla extract. Beat them all together until the mixture is thick and smooth. You want to make sure that your filling is on the firm side, otherwise it’s going to just be more like frosting and going to kind of ooze out everywhere. So.
You want it to be a little bit more thick than frosting would be. So once your cookies are all assembled, you can eat these immediately. If you do have any leftovers, store them at room temperature for up to 3 days. Now when I store these at room temperature, I do not seal them in an airtight container because coconut flour baked goods absorb.
Moisture and because you have a moist filling in between the cookies. If you seal them up, it tends to make the cookies really soft and almost crumbly. So, when I store them at room temperature, I just leave them open on my counter. You can also store these in the refrigerator. If you do store them in the refrigerator, then you need to.
Put them in an airtight container. And you can store them in your refrigerator for up to 1 week. I haven’t tried freezing these, but I’m pretty sure they will freeze just fine. I wouldn’t freeze them for more than a month cuz that’s just me. I don’t like keeping stuff in my freezer for too long, but technically they probably would last longer than a.
Month in there. And then you can just take out however many you want, let it thaw on your counter whenever you’re wanting to eat them and eat and enjoy. And that’s our recipe of the day. I hope you enjoyed it. If you did and you want to see more videos like this, make sure you click that thumbs up like button, click that subscribe button,.
Leave me a comment if you want to let me know if there’s any recipes that you’d like to learn how to make, and I’ll do what I can to get those out there for you. And as always, keep cooking.